Total Pageviews

Tuesday, May 31, 2011

Hanging Basket in Fish Tank

Hanging Basket holding smaller fish

Bluegill are piscivores. They loves to eat them some fish.

I first suspected this when all but two of the happy minnows disappeared in a single day without a trace. Never saw those last two again.

Now, if bluegills ate their own without a trace, I might not have roused myself to make a hanging basket. But they do enough damage to kill the victim fish and nip off the yummy parts (not necessarily in that order). So from time to time I've lifted the lid to find the remains of a meal floating belly up.

Since these remains were always from small fish (< 2 inches), I decided I needed to protect the fish. The basket you see above is just a mesh laundry bag, a section of hose, and a hollow pool noodle (I used a 6 inch length of 3/4" PVC pipe to connect the two ends). I snipped holes in the hose so it would flood, then used a rolled-up bit of snipped hose shoved in the two ends to hold the ends together to form a ring. The only problem is the little fish are hard to catch. But I caught the slow ones (the ones more likely to end up as a meal), and the bag itself serves as a bit of cover. At least that's my theory, which I will proclaim proved if I don't find any more remains...


Then there are the other denizens of the garden. Spiders I actually welcome, and I recognize most the bugs I see. But my daughter was shocked to find a mass of not-so-little black bugs on one of the strawberry plants.

Bugs on the Strawberries

If you happen to know what these are, I'd love it if you'd share. I initially thought they were ticks (yikes!), but on closer examination, I'm back to not having a clue what they are:

Do you know what this bug is?

Monday, May 30, 2011

Keeping Warm


Weaton's "Portable" Rocket Mass Heater, Earth Day 2011

It was crazy hot today - time to be thinking about busting out the shade cloth. But instead I got an education on various heating methods.

Part of my reason for putting up a greenhouse was to extend my growing season. But what to do on nasty cold days?

A Rocket Mass Heater, or RMH for short, can warm a space using less than 15% of the fuel required by traditional wood-burning heaters. Paul Wheaton has a really nice page talking about rocket mass heaters at his permaculture website www.richsoil.com, along with this very nice illustration showing how the stove works:


The heated gas 'rockets' up the combustion chamber, drawing fresh air into the stove around the sticks and pushing air out the exhaust. By weaving the exhaust through piping inside a thermal mass, all the combustibles get a chance to be consumed and the exhaust temperature cools as it transfers heat to the thermal mass. The final exhaust is simply moist air that may be as cool as body temperature. After the fire is extinguished, the heat energy in the thermal mass continues to warm the space for hours, even days.

The basic concept was first described in 1982 by the permaculture folks over at Aprovecho. Their aim was to develop an efficient, low-cost cook stove, which can help billions across the world (millions of whom die each year due to smoke and effects of traditional cook fires). The clean cook stove issue is huge - check out the Global Alliance for Clean Cookstoves.

Getting back to using one of these clean stoves (rocket mass heater) to warm my greenhouse, I would want something I can install for the cool months, with an option to remove it in the summer. So Paul's experiment with a 'portable' stove is right up my alley. And I have several whole months to figure out how I would implement this in my situation.

Here's a longer video showing the Portable Rocket Mass Heater Paul Weaton and crew demonstrated on Earth Day, 2011, up in Missoula, Montana.

Sunday, May 29, 2011

An Accidental Experiment

The Control Plant

I didn't intend to compare growth in my aquaponics system to regular soil gardening. But when I couldn't use all the seedlings my daughter started for me in March, the extras got tossed aside. The "control plant" is a squash seedling that continued to grow in the soil under 'natural' conditions. The scissors are in the picture to give a sense of scale.

Admittedly, a seedling in a soil plot that was being tended by a dedicated gardener might be thriving more than my control plant. But I am not a dedicated gardener, so it seems a fair comparison.

The Aquaponic Specimen

Here we have a squash plant that was started at the same time, but has had benefit of growing in the aquaponic environment. Other than feeding the fish and correcting the pH of my system, I have done nothing more to nurture this plant that I have done for the control plant.

If you look hard, you'll see the scissors at the base of the plant. The size and maturity difference are significant.

Here are a couple more pics, just for fun.

May blossom #1

May blosson #2

Beets I seeded directly in the hydroton

Saturday, May 28, 2011

Wheelchair Gardening

Rolling Thunder crossing the Memorial Bridge in Washington D.C.
Cristiano Del Riccio, 2009

With this weekend being Memorial Day weekend, I have been thinking about relatives, friends, and co-workers who have served in our armed forces, and the many veterans who survived combat but must use wheelchairs to get around.

There are times, thankfully brief, when I've been wheelchair bound. But I got to thinking about what I'd have to do to convert my aquaponics greenhouse for wheelchair accessibility.

Pros for accessibility:
  • The grow beds are raised already
  • Grow media (hydroton or expanded shale) are easy to work
Accessibility considerations:
  • Ensure walkway is paved and level
  • Ensure walkway is wide enough for chair to pass (36" or 915 mm)
  • Ensure there are places where a wheelchair can turn (60"x60" or 1525 mm x 1525 mm)
  • Ensure ramps are no more than 1:12, with 1:16 to 1:20 preferred

To modify my current garden for wheelchair access, I would need to eliminate all piping, cords, and boards that cross the walkway. I would also need to increase the width of the walkway to 36 inches. A 12 ft. by 10 ft. greenhouse would easily accommodate my current system, along with vertical grow towers, in a configuration that could be easily negotiated by a gardener in a wheelchair.

Shout out to readers!

My "Audience" for this past week

One thing that keeps me posting is knowing folks read the blog.

Luckily for me, blogger gives me access to stats on trends, as seen in an example above. The stats are pretty coarse, so no one need fear that I can reverse-engineer the statistics to find you.

But if you want to be found (aka have a question to which you'd like an answer), you can send me a message. I think folks have been googling up my personal webpage (megstout.com) and using the contact form there. Such a nice break from spammers offering to increase traffic to my site...

So across the US and the world, hello!

[I just added a "Follow by E-mail" gadget, should you feel so inclined.]

Monday, May 23, 2011

The Great Energy Challenge


Today 9 households around the world start their energy diet.

Mine is not one of the 9 being featured in National Geographic's 360º Energy Diet, but I've signed up.

Here are the points one can earn in each of six categories (Goods, Food, Transport, Home, Water, and Waste). I've colored the ones I'm already doing green, the ones I'm not yet doing red.

1) GOODS

15 points each

  • Tally your water, electric, & gas use and calculate how you could cut CO2
  • Switch to organic for three produce items you regularly buy
  • Switch to natural/eco-friendly cleaning methods for three tasks
  • Switch from an imported non-produce item to a version produced locally
10 points each
  • Swap disposables that you regularly buy for reusables (e.g., cleaning wipes)
  • Repair or extend use of clothing items rather than buying new ones
  • Use old printer paper/magazines/retail shopping bags, etc. for wrapping paper
  • Rent or borrow an item that you rarely use, such as a drill or steam cleaner
2) FOOD 15 points each
  • Eat a vegetarian diet one day a week
  • Eat at home or brown-bag it at least once per week
  • Limit daily intake of beef to 8 ounces per person
  • Only consume seafood that has been sustainably raised and fished
10 points each
  • Start a food-based garden (hurray for aquaponics)
  • Go vegan or raw one day per week
  • Buy grass-fed beef instead of conventional
  • Give up one processed food that you normally eat
3) TRANSPORT 15 points each
  • Drive no faster than the speed limit, and avoid rapid acceleration/braking
  • Remove extra weight from your car and inflate tires to the proper pressure
  • Use public transportation instead of your car at least once a week
  • Reduce planned air travel by one trip
10 points each
  • Buy carbon offsets for your travel
  • Carpool or find a ride-sharing program
  • Switch to a more fuel-efficient car
4) HOME 15 points each
  • Turn heat/AC off when gone & change the thermostat by 3 ºF to reduce fuel use
  • Set frig to 37 ºF, freezer to 0 ºF, water heater to 120 ºF and washer to cold
  • Replace at least one third of your light bulbs with CFLs or LEDs
  • Disconnect TV, stereo, and computers and other electric devices when not in use
10 points each
  • If you have a second old refrigerator in your house, get rid of it
  • If your refrigerator is > 10 years old, get a new one with a top-mounted freezer
  • Insulate your water heater
  • Replace appliances with EnergyStar appliances
  • Hang clothes up to dry instead of using the dryer
  • Seal all windows and doors in your home with caulk or weather-stripping
5) WATER 15 points each
  • Give up bottled water for filtered tap water
  • Turn off the tap when brushing your teeth or scrubbing dishes
  • Shortening your shower by one minute or more. If you bathe, switch to showers
  • Replace shower head or tap with a low-flow model
10 points each
  • Use xeriscaping for your yard and avoid thirsty plant types
  • Install a rain barrel to collect water for garden, lawn and plants
6) WASTE 15 points each
  • Recycle all glass, aluminum, plastic, paper, batteries, and CF lightbulbs
  • Eliminate junk mail by taking yourself off their mailing lists
  • Change to paperless billing for bank account, credit card and bills
  • Eliminate the use of plastic and paper bags, both when shopping and at home
10 points each
  • Begin composting at home
  • Using biodegradable bags for walking the dog if the family has one
  • Recycle old athletic shoes and clothes
  • Recycle or donate old computers, cell phones and other electronics

Saturday, May 21, 2011

Water Storage and the BioSand Filter


825 gallon rain water catchment system

I live in the US, in arguably the richest county in the US, per capita (Fairfax, VA).

Even so, there are times when no amount of money can make potable water come out of my tap. System flaws (e.g., water main ruptures), acts of God (e.g., hurricanes), or acts of man (e.g., sabotage) can all mess with the availability and/or quality of my water.

Not cool. Thirst, dysentery, and cholera are nasty things.

I'm loving the magnitude of water storage possible with common 55-gallon drums and PVC pipe or hose and hose fittings.

But if I had an infinite supply of water, I'd still have to purify it.

I have my solar oven, with a 'water pasteruization indicator (WAPI),' a little vial filled with soy wax. You put it in a container of water with the wax side up - come back after a day in the sun, and if the wax has melted and re-coalesced at the bottom, you know the water was at 200 degrees Fahrenheit for at least 10 minutes and has been pasteurized.

But I think I've come across something even better: The BioSand Filter. One of these babies can produce 5-15 gallons of clean water in an hour. Here are two videos: a funny one that doesn't really explain the physics/biology of the thing, and an earnest Christian charity one that does a great job of explaining all the details you need to understand:

BioSand Filter - Cute video (light on detail)


BioSand Filter - Earnest Christian video

Wikipedia has a nice article on the BioFilter, and there's a website called BioSandFilter.org that gives details regarding who, how, and what, for those of you who like those kinds of details.

Enjoy!

Thursday, May 19, 2011

Grow Towers and Deep Water Culture

The humble plastic pail with my keys on top

I picked up some barrels from Nova Barrel. Today I wanted to show you what I'm doing with these nifty square 4.5-gallon pails. Next week I'll show you the compost barrel, the black soldier fly harvester, and the potato barrels...

I've played around with deep water culture, sometimes called "floating raft." But you don't have to have a floating raft. You just need to be able to keep the plant's roots in the "nutrient solution."

For now let's hit the trust button that I know how to plumb this into my system. I find I'm better at showing than telling, so let me show you what I've done so far.

Pail with holes and net pots

I pulled out my 2-1/4 inch hole saw (the same one you use to cut holes in doors for doorknobs). Turns out this is the perfect size for one of the standard sizes of net pots. I drilled four holes in the corners of the pail lid. I've already wedged the net pots into the holes in the picture above.

I also drilled small holes in the center of the pail lid. These will allow water to drip into the pails. Below is a picture of the pail with a 3 foot vertical grow tower resting in the center.

Grow tower supported by the pail

I'll be plumbing these into my system sometime in the next week. I'll fill the net pots and tower pockets with hydroton, then planting can begin.

You could do this with regular round 5-gallon pails. There are lots of pail-based deep water culture systems out there, though I don't think I've seen any connected to an aquaponics system. I like the square pails because they have a flat side that will work well with the home-made grey plastic bulkhead fitting I use for the rest of my through-wall plumbing.

Here's a sketch showing how I'll achieve constant height of water in my pails (think Durso Siphon or Standpipe). A crate structure will support the flat sides of the pails and block some of the light that will otherwise get to the roots. I'll anchor an EMT 'loop' in the crate structure to hold the grow towers upright and support the piping for the water coming in from the sump.

Sketch of aquaponic vertical tower/deep water culture concept

Wednesday, May 18, 2011

Aquaponic Square Foot Gardening?

Mel Bartholomew's Square Foot Gardening Logo

In 1981 Mel Bartholomew published his book "Square Foot Gardening," followed by a PBS show highlighting Mel's technique for growing lots of plants in small raised-bed gardens. You can buy "Mel's Mix" at national hardware stores, and I've seen raised beds for sale everywhere from local nurseries to Walmart.

The Square Foot Gardening community has a huge number of blogs dedicated to techniques useful to anyone engaged in intensive home gardening. If you're doing aquaponics, you can skip the soil-related part. But the "when" and "where" of planting is still valid.

Since I'm frankly a neophyte when it comes to gardening, I was thrilled to come across "My Square Foot Garden," a super cute website put together by a lady named Emily, who lives in my former home town, Lehi, Utah.

Emily's "My Square Foot Garden" website

Emily's got a lot of nice information on planting at her site, and she's developed a "Planting by Color" system that explains when to plant seeds, set seed into the garden, etc., based on you spring and fall "colors." [Since she lives north of the equator, her system is currently geared towards summers that occur around July.] If you sign up for Emily's free newsletter, she'll send you e-mails that prompt you when to start different types of seeds and when it's safe to plant them outside.

Emily's "Colors"

I'm a smart person. I know my USDA Growing Zone (7a) and I can read the fine print on my seed packets. But why figure it out for myself when other gardeners have already done all the leg work, particularly if they're offering it for free! If e-mails and/or websites aren't enough for your needs, you can buy Mel Bartholomew's "New Square Foot Gardening" at Amazon.com. Emily's Planting by Color and Gardening for Beginners are available as eBooks

Now all I have to do is figure out how best to adapt their excellent advice to my aquaponic system...

Tuesday, May 17, 2011

Growing Potatoes


Tim MacWelch on starting potatoes in a bin


I talked with my guy over at NovaBarrel.com, and he has seed potatoes that he'll throw in with the barrels for an additional buck. And these aren't just any potato - they're purple potatoes - particularly high in anti-oxidant goodness. And they're not GMO'd to get that deep purple color. They hearken back thousands of years, and were the food Incans reserved for their kings, according to this Chicago Tribune article.

So while I'm out there, I'll go ahead and pick up a barrel or two and some purple seed potatoes. Looking forward to seeing how that works out!

Monday, May 16, 2011

Want to use IBCs or Barrels?

IBCs and 55-gallon drums from novabarrel.com


Though I personally love stock tanks for making an aquaponics system, I just wanted to show you reasonable prices/sources for IBCs and 55-gallon barrels.

Novabarrel is a source local to me here near Washington DC - I can get 55-gallon barrels for $35 or IBCs for $145 (he only has one in stock currently, but expects another dozen or so in the next month). An IBC system (3 IBCs (~$435) cut into a tank, three growbeds, and a sump) could fit in the 10 ft. x 10 ft. HomeDepot greenhouse ($250 delivered to your door). For those in the middle of the country, you can find used IBC containers via eBay, Craig's List, and web searches.

When I was considering a system using 55-gallon drums, I came across a guy in New Jersey who has thousands of the things - blue, green, and white.

One note of caution - the white/translucent barrels and IBCs break down in direct sunlight. You'll want to paint these, unless you need them to stay white/clear for some reason.

The reason I was researching novabarrel again is I'm in search of a white 55-gallon drum so I can make a black soldier fly (BSF) composting system. You can see the 55-gallon drum design for BSF composting at GardenPool.org. BSF larvae power through food scraps, so you get compost faster than standard methods. Plus BSF larvae are good eating for the fishies.

Sunday, May 15, 2011

Stepping Stone Approach - Total cost $1250

Detail from 'Fish in Water' Stepping Stone


Now that I'm happy with my prototype system, let me lay out an incremental approach for building a aquaponics system based on Rubbermaid stock tanks. All you'll need is a drill with a 1 inch bit, a shovel, a level, and a saw. No solvents, no grinders, no silicon, no sanding. All the stuff you'll need should be available locally, though you might need to pay S&H for certain items if you're not in a metropolitan area.

1 - Basic system (3 ft. x 8 ft., $350)

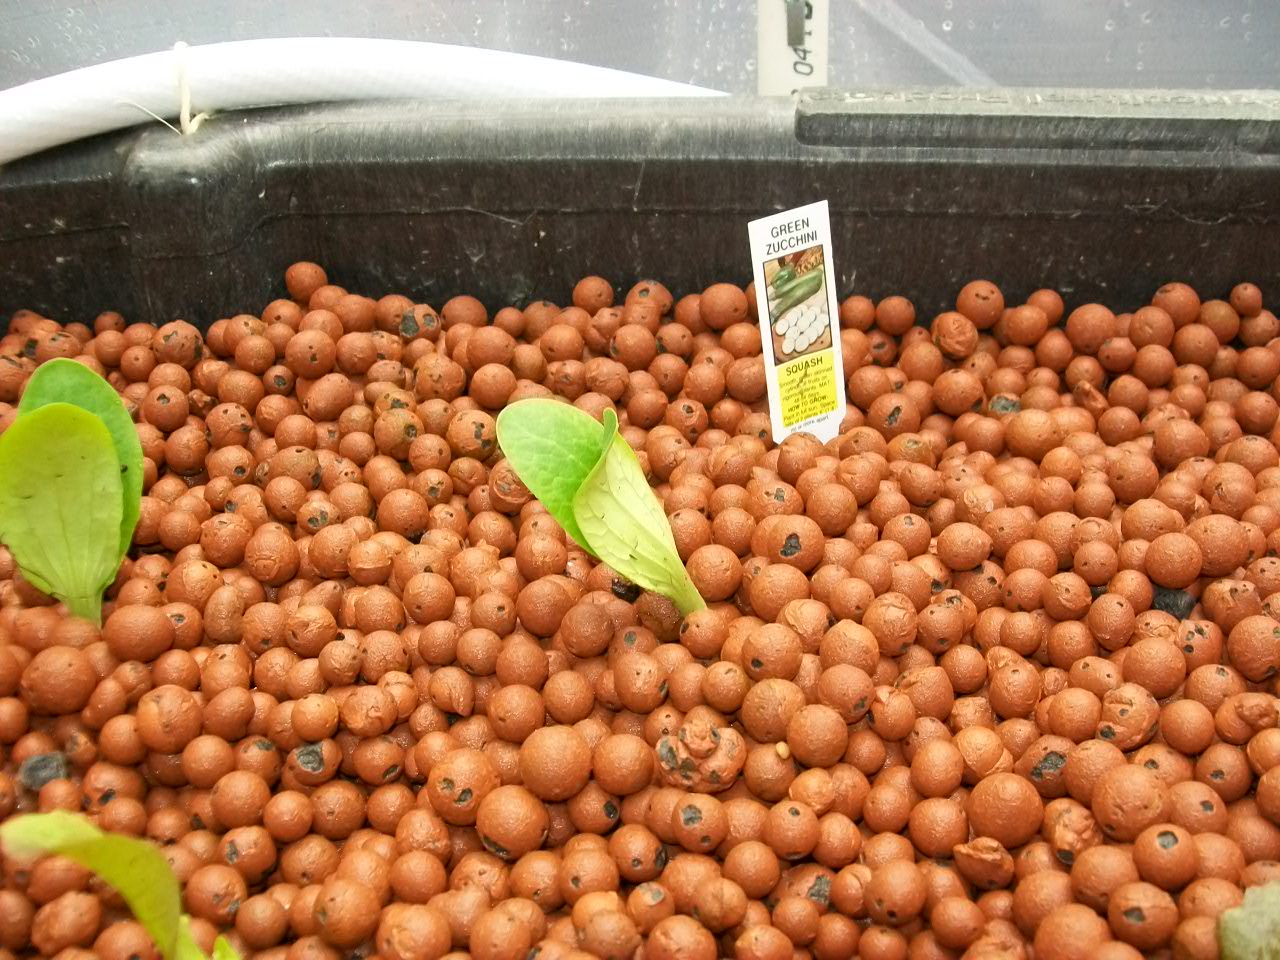
Your basic system will be a single 50 gallon grow bed and a 100 gallon fish tank. Because you're not yet sure you really want to do this, go ahead and use 3/4" river stone for your growing medium. Pick up a handful of feeder goldfish or better yet bluegill, if they're available. If you're thinking of evolving this into a bigger system, you'll want to position things so you won't have to move as you expand. If you and those you love know this will be it, you can stack the grow bed on top of the fish tank for the classic 3x5 footprint.

You might as well prepare for success by buying all the little odds and ends needed to test your water, 'cycle' your smallish system, and adjust water quality.

2 - Add a grow bed (+$300)

Things have been going great, and your nitrate levels are starting to get pretty intense. At this point you'll want to add another 50 gallon growbed (with supporting blocks and planks). Now is also the time to upgrade to the big pump. A 1000 gph pump doesn't cost much more than the little thing you bought for your initial system. This is also the time to switch from that flimsy black tubing to serious no-kink lead-free garden hose.

3 - Add a 150 gallon CHOP fish tank, kiddie covers, and a shelter (+$300)

You know you hate how the fish tank water level fluctuates, not to mention the way the water level dips due to evaporation when you forget to check for days (weeks) at a time. Besides, there's the time you found the cute little person wading in the fish pond, trying to catch the fish with their hands... Now's also a good time to lay out the foundation and 'hoops' for your greenhouse and at least enough plastic sheeting to keep the rain off you and keep all those tree seeds out of your grow beds.

4 - Add grow beds 3 & 4 (+$300)

The nitrate is getting intense again - must be the way those fish are exploding now that they have a safe, constant water space to swim around in. It's also a good time to finish off the rest of the greenhouse, now that you've found chunks of plants missing (was it a hungry squirrel, raccoon, or neighbor...?).

5 - Let your imagination take you

You might want to add a floating raft bed for fast-growing vegetables, or add grow towers for strawberries and herbs. These details will be dictated by your interest and space constraints.
__________________________

Based on today's prices at chain stores, total cost for the 40 sqft growbed system, including greenhouse, fish, and media, should come in at under $1250, assuming one goes for the inexpensive options (e.g., growing own plants from seeds versus getting semi-mature plants from nurseries, locally sourced river stones versus S&H and cost for expanded shale or hydroton).

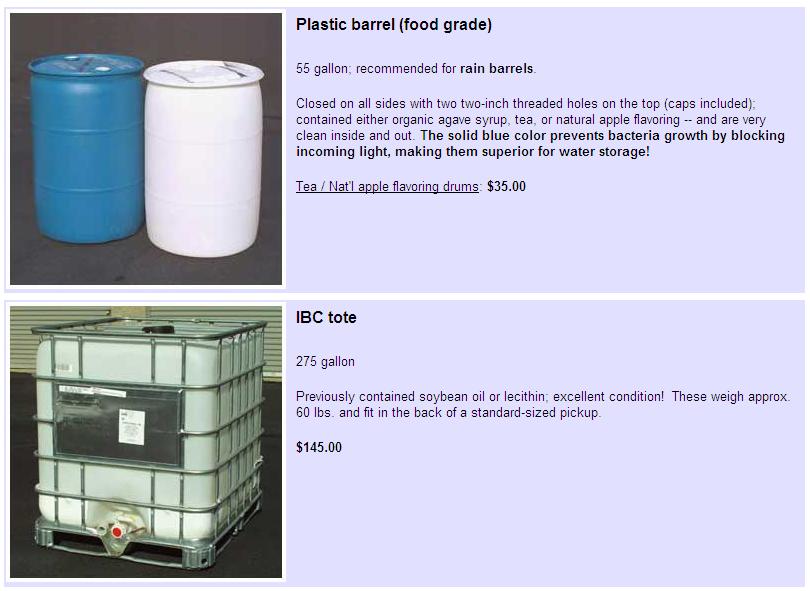
Compare how much it will cost to do this versus other systems, making sure you compare apples to apples (most kit prices don't include media, fish, or things like pumps and cinder blocks, etc.). You might be able to create a cheaper DIY system from intermediate bulk containers (IBCs) or 55-gallon drums, but you'll likely spend more time and effort.

Here's a reasonable budget for each part of the total system:

  • Rubbermaid stock tanks - $480
  • Cinderblocks & planks - $60
  • Kiddie covers - $30
  • Pump, hose, & fittings - $140
  • 4 Bell siphons - $40
  • CHOP plumbing - $15
  • Air Pumps, tubing, & air stones - $60
  • Media - $50 to $500 (depending on type and if available locally).
  • Fish - $40 (50 bluegill for ~$0.60 each [3-5" size])
  • Seeds - $10
  • Extras (Seasol/Maxicrop, ammonia, water test kit, pH up and/or down) - $100
  • 8 ft. x 12 ft. Greenhouse - $200

Water cooler-style auto top up

Here's a couple of short videos showing my water cooler-style auto top up


Bottle Empty


Inserting Full Bottle


I didn't think to pull out the base to show you, but it is just one of the bottles I used to use for my window farm. I cut off the top of a standard 5-gallon water bottle (I drilled a 1-inch hole near the top, then used tin snips, finishing the edge with some 1/4-inch tubing sliced so it could fit over the raw edge of the plastic). Since I need water to flow in and out of the base, I drilled additional 1-inch holes near the bottom. If you drill too fast, the plastic can rip (why would I know this...).

Here's a picture showing what the 5-gallon bottle looks like with the lid snipped off (I originally did this to create a fish tank for my aquaponics window farm system):

Lots of Nitrate

Water Chemistry Results - 05/14


Last week when I tested my water chemistry, my pH was about 8.0. Ammonia was at 0.25 ppm, nitrite was at 0.25 ppm, and nitrate was about 40 ppm.

So the past week I added 1-2 tablespoons of 'pH down' morning and night, testing the pH as I went. (Didn't bother doing all the tests each day, since the ammonia-nitrite-nitrate series of tests take about 10 minutes to complete, whereas pH is immediate.)

Happily, I've gotten my pH down to 6.6.

Unhappily, my nitrite and nitrate have shot up.

Happily, the remedy for high nitrate is to plant more plants. So here are the new additions:

Rosemary


Red Sails Lettuce


Cucumbers (3 plants)


Sequoia strawberry (3 plants)


Better Belle pepper


Cherry tomato


Butter Crunch lettuce


Next project: finish enclosing the ends of the greenhouse...

Someone's been eating the cabbage...

Friday, May 13, 2011

Great deal on a Greenhouse


The Harbor Freight 10 ft. x 12 ft. greenhouse is nicely affordable. You can't get a store-bought greenhouse of this size for anything close to the $850 Harbor Freight price.

Because it's spring, Harbor Freight has reduced the price on their 10'x12' greenhouse by $50. At my local store, the sale is good through the end of May.

Better yet, you can get an additional 20% off through May 15th (google Harbor Freight coupon).

So if you have the 20% coupon and go to the store, you can pick up a 10'x12' greenhouse for only $640 (plus tax). If you have to have it shipped, tack on $100 S&H.

This greenhouse gets decent reviews. Typical problems can be overcome cheaply. YouTube has numerous videos on "Harbor Freight greenhouse improvements." John at Growing Your Greens gives a nice overview of possible improvements (fast forward to 4:40). An additional idea is sealing the edges of the panels with waterproof aluminum tape.

If you, like me, don't need a greenhouse at the moment, check out the sale price on the 45 watt solar panel kit. It's not as cool as a Solman 135 watt generator, but it's easier on the budget...

15 May update - Found another possible greenhouse option at Home Depot. I'd have to modify my layout to fit the 10 ft. x 10 ft. footprint, but I'm sure I could get it to work. $249 delivered straight to my door is rather attractive (though my community covenants would still prohibit me using this particular product since it's 8 ft. tall ::pout::).

The Fish are Trained


The main purpose of an aquaponics system is growing plants.

The fun part of aquaponics is feeding the fish.

When I first got my fish, they ignored chow time. I'd toss pellets in the tank, and there'd be no sign anyone was in there.

Now that I've got a cover on the tank, I only ever lift the cover when I'm about to feed the fish. When I lift up the lid, I find them waiting for me near the surface. Once the pellets hit the water, the water comes alive. In seconds, the fish have snatched all the pellets from the water's surface.

Sweet!

Tuesday, May 10, 2011

Lyme, anyone?

Deer Ticks - blech...


I was on a field trip to the Williamsburg, VA, area this past weekend. While sitting in the grass near some school taking a snack break, I noticed a couple tiny ticks climbing on my leg. I brushed them off and mentioned ticks to the kids near me.

Fast forward a couple of days. Apparently I'd brought a tick home with me. The spouse did his best to remove the thing, but it required a doctor with an 18 gauge needle to dig all the bits out. Results from the Lyme titer will come back soon.

Benefit of aquaponics: you're unlikely to have ticks hanging out in your aquaponic growbeds or fish tanks, particularly if they are enclosed in a greenhouse.

Sunday, May 8, 2011

Pump plumbing, Topping Up, and Kiddie Covers

Using garden hose to carry water from the sump


I was stymied about how I was going to carry the water from my 1000 gph pump back to my four growbeds. I'd looked into 1" no-kink pond tubing and associated fittings/valves, but the tally was getting pretty pricey.

When I was first plumbing the 1000 gph pump in for just 2 growbeds, I figured garden hose might work - and if I was wrong, I would only be out the price of a single length of hose and a single splitter (with built-in ball valves). Garden hose ended up working fine for just two growbeds.

I still wasn't sure garden hose would work for the full-up system, particularly with the long (23') lengths needed to reach each of the two growbeds on the opposite side of the greenhouse from the sump. But I was willing to try. Turns out garden hose works like a charm. I even have to throttle the flow just a tad.

You'll want to get hose that is safe to use for drinking water, because regular hose can leach lead into the water. This set-up requires 60 feet of hose, so you could either get a single 75-foot hose (~$40 via Home Depot, search "lead-free hose") or two 50-foot hoses (~$23 each via Home Depot, search "neverkink boat hose"). You can get free shipping if your total order is over $50, assuming your local store doesn't have these hoses in stock.

Auto Top Up - Think Water Cooler


In watching Murray Hallams "Aquaponics: The First 12 Months," I saw his contraption for automatically adding water when the tank gets low - like the ballcock older toilets use to shut off flow into the bowl when it's full of water after a flush. He had his hooked to the home-owners water spigot. My only trouble was I couldn't find the exact configuration at my local hardware store, and googling ballcock with my computer's kid-friendly browser settings made finding anything online even harder.

Since I currently have goldfish in the sump, and plan to use the sump for small fish, I don't want my sump to run dry. Even if I couldn't find the exact contraption Murray uses.

I came up with the idea of a water reservoir, like a water cooler. I use the standard 5-gallon bottles to do this. I cut the neck off the bottom bottle and drilled 1" holes into the sides to allow tank water in.

Next I add 1/2 teaspoon of Amquel to an empty 5-gallon bottle, then fill with tap water. The Amquel removes chlorine and other nasty stuff from the tap water.

Finally I invert the regular 5-gallon bottle and rest it in the top in the modified bottle.

As the water in the system evaporates, the water in the 5-gallon reservoir glugs out, bit by bit. I anticipate this will make 'adding water' a weekly chore and eliminate risk that my sump runs dry without me noticing.

Construction of a Kiddie Cover


I don't have kids that could/would drown in 20" of water, but 'Kiddie Covers' make the fish happier. Bluegill, at least, don't like to be without cover (fear of predators that might scoop them out). Plus bluegill are known for jumping out of the tank (lost one myself that way).

I just used cheap 1x3 for the covers, supported by frames made of inexpensive 2x3. This picture showed in this post has a close up of the more complicated sump tank lide, which has a cut-out for the 5-gallon reservoir.

Finally, below is a link to some video footage I shot today. The first video is really long (over 12 minutes) showing how the kiddie covers work, feeding fish, how the CHOP plumbing works, the final bell siphon design, and the top-up tank.

The second video is 3 minutes long and explains how I plumb the water to the growbeds on the opposite side of the greenhose (and talks about my solar oven).


Friday, May 6, 2011

Connecting the Tanks (Pictures from 29 April)

Piping connecting the fish tank to the sump


To achieve a "constant height of pond" (CHOP) in my bigger tank, I needed to install pipes to let water flow down to the sump.

I used 3/4" pipes to plumb through the tank walls, because that way I could get away with using the 1" drill bit. I drilled two holes near the top of the tank, in the recessed 'ribs' so the piping wouldn't stick out as far. If I was doing this a second time, I would locate the holes a couple of inches lower, but this works.

Once the two pipes coming from the fish tank join, I transition to 1" piping, to make sure flow out of the fish tank isn't restricted by the plumbing joining the tanks.

[After I already had the fish in the tank, I realized I would have to turn the tank so the side with the ribs close together faced the sump. Not sure the fishes liked having the water drained down to almost empty, but I was glad to be able to move the tank without having to net everyone out.]

The fish tank, with pipes to suck water up from the bottom


The 3/4" pipes in the fish tank extend down to the bottom, forcing water from the bottom of the tank to flow out of the tank when the grow beds drain into the fish tank. I drilled a pattern of 13 holes in each end-cap and cut small slices at the very end of the pipe with my miter saw. This allows enough flow through the bottom of the pipe so water drains well (else the fish tank could overflow). The reason to use two pipes is so drainage can still happen even if one pipe gets blocked.

This picture was taken before I actually plumbed the two tanks together, so the 1000 gph pump is still in the fish tank. I used regular 5/8 hose and a garden hose splitter. Turns out 5/8" no-kink garden hose and regular splitters work fine - they are inexpensive and come with built in ball valves. After these pictures were taken, I replaced the green hose with white hose that is lead-free and certified safe to use with drinking water.

Goldfish in the sump


Once I get to the sump, I transition back to 3/4" pipes, again so I could get away with my 1" drill bit. You can see the 45 degree joint that lets the water from the grow beds and fish tank flow into the sump with minimum noise.

I've been running the system for almost a week since these pictures were taking, and it works just fine.

Grow bed 1 of 4 (lots of different plants)


For the record, here's what the grow beds looked like when I plumbed the tanks together.

Grow bed 2 of 4 (lots of basil)


Grow bed 3 of 4


I ended up adding hydroton to all my beds when I couldn't coordinate getting the expanded shale delivered before my fish had to be bought. Too much travel, between spring break vacation and work trips.

Even though I would have preferred the expanded shale, a nice thing about the hydroton is it is distinctly different in color and shape from couple inches of gravel from my original system in the bottom of each grow-bed.

Grow bed 4 of 4 (check out the banana plant)


In the week since these pictures were taken, I've shifted the pump to the sump, invented a way to keep the water topped up, and built kiddie covers for the tanks. But I'll cover those items in future posts.

G'night!

Monday, May 2, 2011

Contagious Aquaponics

My Mom's Greenhouse


My Mom was visiting a couple of weeks ago and the conversation turned to aquaponics. Naturally. Turned out she'd had plans to do a garden this year, but her yard space got pre-empted by recession-related events in the lives of relatives. But she still has full use of her 10'x12' greenhouse.

By the end of the weekend, I'd set her up with bell siphons and lots of information. She's started her own blog over at utahponics.blogspot.com, should you wish to see how she's doing things.

She liked my rubbermaid stock tanks, but already has a bunch of sturdy bins that might work, plumbed together in series. Also, she lives in a climate where termites and moisture are less problematic, so she can consider using wood in the structure of her tank and beds.

She also has a surplus swamp cooler, so is considering doing cold-water aquaponics (trout and 'cold weather' vegetables). Pretty fun!